Arepas
Start with the sound. A good arepa gives two signals: a soft crackle as the crust cools, then a hollow knock when you tap the base. Getting there takes 300 g of masarepa, 400 ml of warm water, and two stages of heat, because a fast sear will color the outside long before the middle sets. The dough mixes in 15 minutes, the batch cooks in 25, and you end up with eight corn cakes ready to split and stuff. Fill them while they are still warm. Breakfast stops being a compromise.
- Prep
- 15 min
- Cook
- 25 min
- Total
- 40 min
- Serves
- 4
Ingredients
What you’ll need — tap to tick off as you go
- 300 g
- 400 ml
- 1 tsp
- 2 tbsp
- 200 g
- 30 g
Process
Timers built in · swap anything · ask as you cook
Combine 300 g masarepa and 1 tsp fine salt in a large bowl. Pour in 400 ml warm water and work it with your hand until the flour is fully wet. It looks loose at first (wetter than you expect). Then it firms as the flour drinks, and you keep working until you feel no grit between your fingers, because dry pockets stay gritty after cooking, and no bake evens them out.
Add 1 tbsp vegetable oil and knead for 2 minutes, pressing the dough against the side of the bowl, until it is smooth, slightly tacky, and holds a ball without slumping. Press a small piece flat (a dry dough cracks at the rim). Feel, do not guess: if the edge splits, work in warm water a tablespoon at a time and test again.
Rest the covered dough for 5 minutes so the flour finishes absorbing water. Cut it into eight even pieces and shape each into a ball. Press each ball into a round about 1 cm thick and 8 cm across; a thicker disc stays raw at the center, a thinner one dries out. Wet a finger and smooth the rim, since an open crack splits once the disc hits the heat.
Set a wide non-stick skillet, or a flat griddle, over medium heat and film it with the last 1 tbsp of vegetable oil. Griddle them in batches, 5–6 minutes a side, until a dry golden crust forms and they release without tugging. The pan matters. Resist flipping early, because the crust needs uninterrupted contact. If the surface browns in under 3 minutes, the heat is too high, so drop it a notch.
Slide the browned arepas onto a baking sheet and into a 200°C oven for 10–12 minutes, until they puff a little and the base answers with a hollow knock. Crust first, oven second. The oven is what sets the center. An arepa pulled straight from the skillet stays heavy and pasty inside, and a dull thud means another 2–3 minutes.
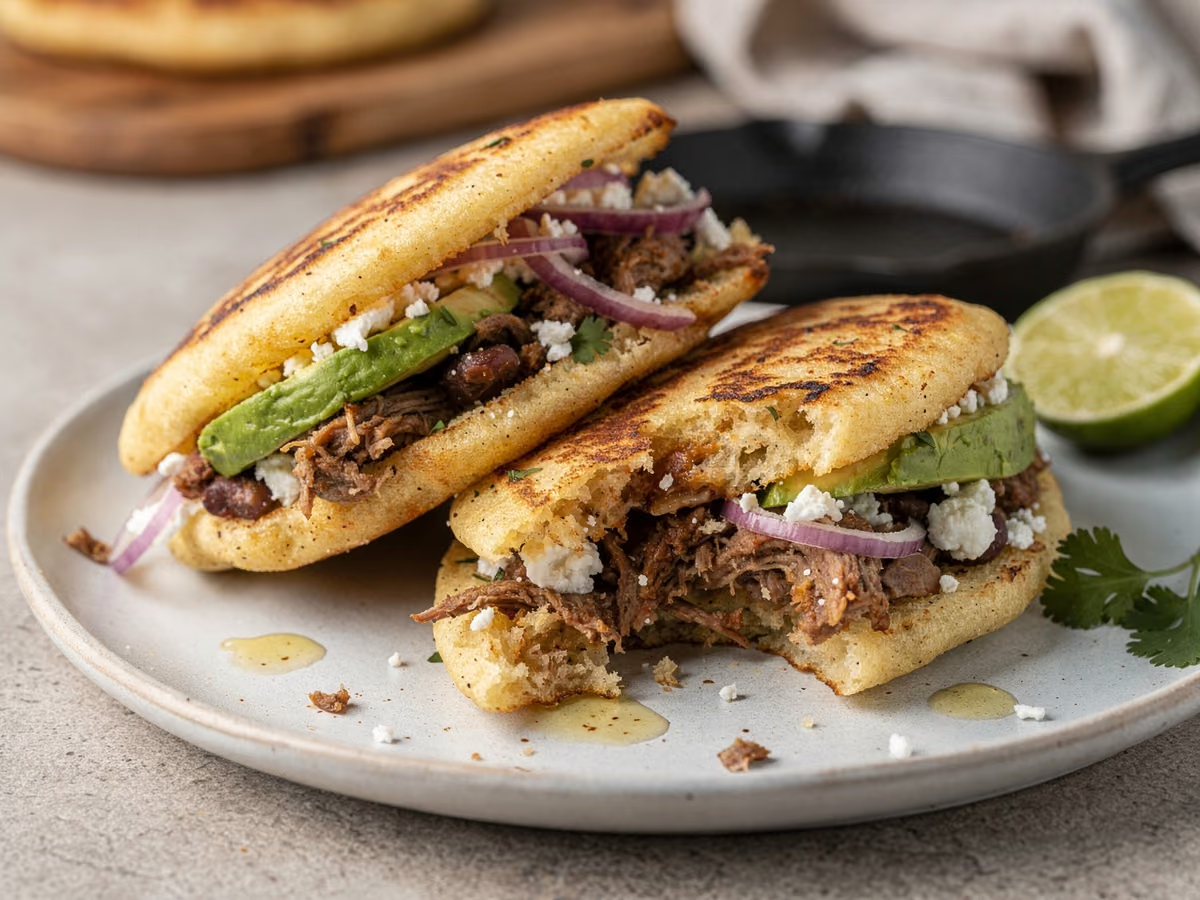
Give the arepas 2 minutes to cool, long enough to handle without burning your fingers, because a knife pressed into a steaming arepa tears the crumb. Split each one horizontally, cutting around the rim and leaving one side attached like a pocket, since a through-cut leaves two dry halves. Brush the hot inside with the 30 g butter while the crumb still steams, if you are using it.
Divide the 200 g queso fresco among the eight pockets and tuck in slices of avocado, packing them loosely so the hinge takes no strain. Fill them generously, but do not press the pocket flat, because the cheese needs room to sit in a soft layer rather than a paste. Serve immediately. The cheese softens against the hot crumb, and the crust is still crisp.
Why this recipe works
Masarepa is precooked corn, so its starch needs warm water rather than a long boil, and the 5-minute rest lets that water finish moving through the flour. It is also why a loose mixture turns smooth in your hand, while cold-water dough stays stiff and grainy no matter how long you knead it. On the griddle, the outside sets into a crust before the middle can dry out. That shell holds the shape. Steam does the rest. The oven drives steady heat to the center until the crumb sets, which separates a light arepa from a heavy one. Why does the tap matter? A hollow note tells you the middle is no longer dense.
Equipment
- Large mixing bowl
- Whisk
- Measuring jug
- Kitchen scale
- Heavy non-stick skillet or flat griddle, about 26 cm
- Wide spatula
- Rimmed baking sheet
- Small paring knife
Kitchen notes
Kitchen notes
- Weight beats volume. Weigh the masarepa instead of scooping it. A cup taken straight from the bag can weigh far more than a cup spooned and leveled, and the 400 ml water is built around 300 g of flour, so a heavy scoop makes a stiff dough.
- Wet your hands. A damp palm smooths the surface and keeps the dough off your skin, which matters more than a dusting of flour on the bench and saves you a sticky cleanup.
- Start with a test arepa (the first one is always a guess). The pan needs a few minutes to settle at medium, so don't worry if it looks pale.
- Do not crowd the skillet. Arepas need space for steam to escape, and an overloaded pan drops its heat and produces pale, tough crusts instead of the deep gold you are after.
- Keep finished arepas on a rack in a low oven while the rest cook, with the door cracked so the crust stays dry. Do not stack them. Trapped steam softens the shell you just built.
- Want a crisper shell? Take the first side to the full 6 minutes before you flip. Split and fill at the last minute, because a filled arepa left standing goes soggy from the inside out.
Common mistakes
- Gummy, dense arepas: masa harina or fine cornmeal went in instead of masarepa. Those flours are milled and dried differently, so neither hydrates into a dough that holds the way masarepa does; buy a bag marked precooked and put back anything that says cornmeal.
- Cracks around the rim mean the dough is short of water. Add warm water a tablespoon at a time, knead it in, and press a test piece flat until the edge stays smooth, since a crack that is already open will split wider in the pan.
- Burnt outside, raw center: the skillet ran too hot, so the crust set before heat reached the middle, and no amount of oven time will undo a scorched surface. Hold the pan at medium and finish every batch in the 200°C oven.
- Heavy, pasty middle: the bake was skipped or cut short, and 5-6 minutes a side on the griddle does not set the center of a 1 cm disc. Give them the full 10-12 minutes at 200°C, or cook them 8-10 minutes a side on the griddle alone.
- The pocket tears when you fill it: the cut went too deep or the cheese was packed in. Keep the hinge intact and divide the 200 g evenly.
- Dry crumb: the bake ran past 12 minutes at 200°C, or the dough was mixed stiff. Pull them as soon as the tap sounds hollow.
Serving suggestions
- Breakfast plate: a split arepa with queso fresco, avocado, and a fried egg on top, with hot sauce for anyone who wants it.
- Black beans simmered with cumin, spooned into the pocket instead of the cheese.
- A sharp slaw or sliced tomato alongside balances the cheese and butter, and gives the plate something cool and crunchy.
- Day-old arepas split and toasted in a dry pan make a fine base for a sandwich or a bowl of soup, and they crisp back up in minutes.
- Serve them hot from the pan, with butter melting into the crumb. That is the version worth repeating.
Variations
- Arepas de queso: fold a handful of crumbled queso fresco into the dough before the rest, then griddle as written; the cheese melts into the crumb and the pocket needs less filling.
- Arepas de leche: swap the 400 ml water for whole milk. The crumb turns softer and richer, and the discs brown faster than the water version, so hold the pan at medium and watch the first batch closely.
- No oven? Cook them 8-10 minutes per side over medium heat, turning twice. The result is denser, but it works.
- Air-fryer finish: 8 minutes at 190°C after the griddle, in place of the bake; the crust stays crisp and the center sets.
Refrigerator
- RefrigeratorCool the arepas completely on a rack, then keep them in a lined box in the fridge, no longer than 4 days, with parchment between the layers so they do not stick, and keep them away from anything strong-smelling. Refrigerate within 2 hours of cooking, the USDA window for perishable food.
- ReheatingA 180°C oven needs 8-10 minutes from chilled and 15 from frozen, until the crust crisps again and the center is hot through. The oven is your best bet. Skip the microwave. It turns the crumb rubbery and leaves the center cold.
- FreezingLay the cooled arepas flat on a tray to freeze, then bag them with parchment between the discs (parchment is what keeps them from fusing) for up to 2 months. If you would rather thaw first, let them sit in the cold overnight, then warm as above, and do not refreeze after thawing, since the crumb goes mealy the second time.
- Make aheadMix the dough, cover, and refrigerate for up to 24 hours, then let it lose its chill for 20 minutes before you shape it, since cold dough cracks at the rim. Shaped discs can wait 12 hours layered with parchment, and it's fine to shape them the night before.
Updated:
How this recipe was developed
- Serious Eats, Venezuelan-Style Arepas (oil in the dough yields a tender crumb; an oven finish cooks the center without burning the crust)
- Epicurious, Classic Arepas (precooked arepa flour is not masa harina; dough should be tacky, not sticky; rest before shaping; hollow tap for doneness)
- USDA FSIS, Leftovers and Food Safety (refrigerate within 2 hours; keep 3 to 4 days; reheat to 74°C; freeze 3 to 4 months)
- Harold McGee, On Food and Cooking (starch gelatinization, and how precooked corn flour hydrates and sets into a crumb)
Editorial references are kept internally for verification. This page makes no claim of external certification or professional testing.
FAQ
The questions we get asked most
Why do arepas crack or fall apart in the pan?
Underhydrated dough is the usual cause, and the wrong flour is the other one. Masarepa needs enough warm water to make a soft, tacky dough, so press a small piece flat before shaping and add water a tablespoon at a time until the edge holds. If the bag says masa harina or cornmeal, no amount of water will fix the batch, so rest the mixed dough for the full 5 minutes and let the flour keep absorbing as it sits.
How can you tell when an arepa is cooked through?
Tap the base. A hollow, light sound means the crumb has set, while a dull thud means another 2-3 minutes in the oven. Look for slight puffing, a crust that feels firm rather than soft when pressed, and no doughy give at the center. No thermometer needed here; the tap and the puff are the tests that matter.
Is regular cornmeal or polenta a workable swap for masarepa?
No. Neither is precooked the way arepa flour is, so they stay gritty and the dough crumbles instead of holding. Masa harina is closer in color but ground and dried for tortillas, and it bakes up dense and gluey, with none of the spring you want in a pocket. Look for a bag labeled masarepa or harina de maíz precocida.
Can the dough be mixed a day ahead?
Yes. Cover it and refrigerate for up to 24 hours, then give it 20 minutes on the counter before shaping, because cold dough cracks at the rim. You can also shape and stack them with parchment between, and they hold for 12 hours, which is enough to get breakfast on the table without an early start.
Do cooked arepas freeze well?
They freeze well. Cool them, spread them flat to freeze, then bag with parchment between the discs for up to 2 months. From frozen, 180°C takes 15 minutes; thawed, 8-10. Never refreeze a thawed arepa.
Why are mine dry and crumbly inside?
Overbaking is the first suspect: past 12 minutes at 200°C the crumb gives up its moisture. A stiff dough does the same thing, so aim for soft and slightly tacky, not firm, and split and fill them while they are hot, since the steam inside the pocket keeps the crumb tender.
Can you make arepas without an oven?
Yes, on the griddle alone, 8-10 minutes per side over medium heat, though the result is denser. Set the air fryer to 190°C and give them 8 minutes after griddling, which gets you closer to the baked texture without drying the middle. The hollow tap still tells you when they are done.
Ask KitchenMind about this recipe
Tell it what’s different tonight — it works within the actual recipe.