Homemade Baguette
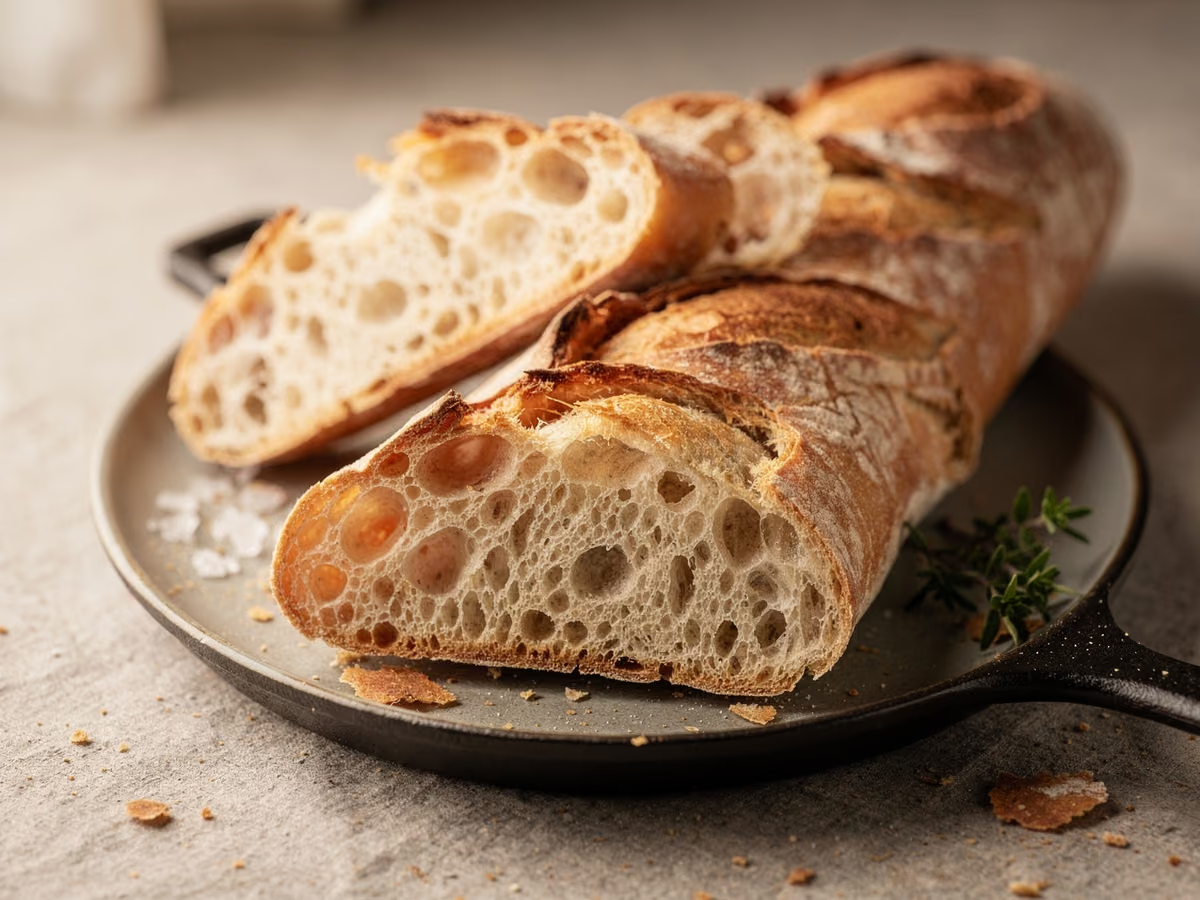
Homemade baguette with a shattering crust and an open, irregular crumb, built from 500 g of bread flour at a slack 72 percent hydration and developed with four sets of folds instead of kneading. A linen cloth holds the shaped loaves, a hot stone and a burst of steam do the oven work, and three shallow angled slashes let each loaf tear open along controlled lines. Plan on 30 minutes of active work spread over about three hours of rests and proves, with the oven preheating for the final 30 minutes.
- Prep
- 30 min
- Cook
- 25 min
- Total
- 100 min
- Additional time
- 45 min
- Serves
- 8
Ingredients
What you’ll need — tap to tick off as you go
- 500 g
- 360 ml
- 7 g
- 10 g
- 1 tsp
Process
Timers built in · swap anything · ask as you cook
Put the 500 g bread flour in a large bowl, add the 7 g instant yeast to one side and the 10 g fine salt to the other, then stir together with your hand. Keeping the salt and the yeast apart until the moment of mixing stops the salt from drawing moisture out of the yeast where the two meet.
Pour in the 360 ml lukewarm water and mix with a wooden spoon or your hand until no dry flour remains. The dough will be sticky and shaggy, which is exactly what 72 percent hydration looks like; resisting the urge to add more flour now is what keeps the crumb open later.
Cover the bowl with a plate and leave it at room temperature for 20 minutes so the flour can hydrate, then wet your hand and fold the dough over itself four times, rotating the bowl a quarter turn between folds. Folding builds gluten without the kneading this wet dough cannot take.
Repeat the fold every 20 minutes, three more times, then cover the bowl and leave the dough to rise undisturbed for 1 hour. It should feel smooth and elastic by the last fold, and visibly puffed to about 1.5 times its original size by the end of the hour.
Scrape the dough onto a lightly floured worktop with a bench scraper and cut it into 3 equal pieces. Tuck the edges under each piece to make a loose ball, cover with the oiled cloth and rest for 15 minutes, which relaxes the gluten enough to roll the logs without tearing.
Flatten one ball into a rough rectangle, fold the top edge down to the middle and press it in, fold the bottom edge over that, then roll the dough away from you with your palms, pressing lightly, to a log about 35 cm long with tapered ends. Keep just enough flour on the bench to stop the dough sticking.
Lay each log seam-side down on a floured linen cloth, pleating the cloth up between the loaves so they hold their shape, cover with the cloth and leave to prove for 45 to 60 minutes. Flour the cloth first so the slack loaves can be moved without deflating them.
Heat the oven to 240°C with a baking stone or an upturned heavy tray on the middle shelf and a deep roasting tin on the oven floor, for at least 30 minutes. The stone must be fully saturated with heat; a lukewarm stone drags the base of the loaf down and takes the oven spring with it.
Roll each loaf onto a floured peel or the back of a tray, then slash 3 shallow cuts along the length at a 30-degree angle with a sharp blade, overlapping each cut slightly, and load straight away. The slashes decide where the loaf opens, so cut immediately before baking rather than letting the surface dry and seal.
Slide the loaves onto the hot stone, pour the 250 ml boiling water into the roasting tin below, keeping your face and arms clear of the steam, and shut the door immediately. Bake for 20 to 25 minutes, without opening the door for the first 12 minutes, until the crust is deep golden and the base sounds hollow when tapped.
Cool the baguettes on a wire rack for at least 20 minutes before cutting. The crumb is still setting and steam is still escaping through the base, so a loaf cut hot goes gummy, and one left on a solid tray traps that steam and softens the crust.
Why this recipe works
A slack dough needs structure, and folds rather than kneading are how this one gets it: each set of folds lines up gluten that had time to hydrate during the 20-minute rests, so four sets turn a shaggy mass into something that holds gas while staying wet enough to prove open. The 72 percent hydration is the crumb's insurance, because that water becomes the steam that inflates the holes a baguette is judged by. Oven steam works twice: it keeps the crust skin stretchy through the early minutes so the loaves can finish their spring, then it must clear away so the surface dries and browns into a crust that crackles.
Equipment
- Large mixing bowl
- Bench scraper
- Wooden spoon or dough whisk
- Clean linen cloth or couche for proving
- Lame, razor blade or the sharpest thin knife you own
- Baking stone or a heavy upturned tray for the middle shelf
- Deep roasting tin for the steam
- Instant-read thermometer and a wire rack
Kitchen notes
Kitchen notes
- Build tension on each preshaped ball by dragging it a short distance across an unfloured patch of bench; that taut skin is what makes a slack loaf stand tall during proving instead of spreading sideways.
- If the dough fights you while rolling out, cover it and wait 5 more minutes. Forcing tight gluten stretches the surface unevenly and tears it, and a torn surface shows up as a lopsided loaf.
- Keep a bowl of cold water at the bench. Damp hands grip wet dough without sticking, and any dough that does cling to your fingers rinses off under cold water, never warm, which makes it tackier.
- Preheat the roasting tin along with the stone: pouring boiling water into an already-hot tin flashes it straight to steam, while a cold tin spends the first minute of the bake just heating up.
- Plan the timeline backwards: the folds are quick visits to the kitchen while something else happens, and the 45-to-60-minute prove can overlap with dinner prep. Only the shaping and the 25 minutes of baking demand your full attention.
Common mistakes
- Flat loaves: the dough was over-proved, or it never built enough strength. Prove only until a floured finger leaves a dent that springs back slowly, do all four sets of folds, and use flour with at least 12 percent protein; dough that spread sideways on the cloth has gone too far and should be reshaped and re-proved for 30 minutes.
- A thick, leathery crust: not enough steam reached the loaves, or the door came open early and let it escape. Pour all 250 ml of boiling water in as the bread goes on, keep the door shut for the first 12 minutes, then let the oven dry out so the crust can crisp rather than stay chewy.
- A pale, blond crust that never colours: steam left hanging in the oven keeps the surface moist, and browning cannot start until it dries. If your oven holds steam badly, crack the door open for the last 5 minutes so the crust can deepen to a proper dark gold.
- Slashes that close up and a loaf that bursts out of the side: the blade was dull, the cut too shallow, or the scoring happened too early. Use a razor or the sharpest thin blade you have, cut at 30 degrees about a centimetre deep, and slash each loaf in the moment before it goes into the oven.
- Dough that keeps grabbing your hands: that is 72 percent hydration behaving normally, so add as little flour as possible. Move it with a bench scraper and wet hands, keep any dusting for the bench rather than the dough, and remember that every extra handful of flour tightens the open crumb you are after.
Serving suggestions
- Slice and serve the same day, within a few hours of baking, with salted butter.
- A natural alongside soup, a cheese board or a bowl of mussels; tear rather than slice if you want the crust to stay crisp.
- Day-old loaves make better garlic bread than fresh ones: split lengthwise, toast the cut faces, then rub with a cut clove of garlic.
- To refresh a tired loaf, run it briefly under the tap and bake at 200°C for 5 to 7 minutes, which brings the crust back and steams the crumb soft again.
Variations
- Demi-baguettes: divide the dough into 6 pieces instead of 3 and roll them shorter; thinner loaves bake faster, so check them a few minutes earlier.
- Wholemeal blend: swap 100 g of the bread flour for wholemeal and keep the 360 ml of water, adding a splash more only if the dough feels tight; the crumb is slightly denser and the flavour nuttier.
- Overnight cold prove: shape the loaves, hold them on the floured cloth in the fridge overnight, covered, then bake straight from cold with a few extra minutes in the oven; the cold skin bakes up blistered and the flavour is deeper.
Refrigerator
- RefrigeratorNot recommended for the baked bread: refrigerator temperatures firm up the starch and turn the crumb stale within hours, while the crust draws moisture out of the middle and goes leathery. Keep loaves at room temperature instead.
- ReheatingSprinkle the crust with water and bake at 200°C for 5 to 7 minutes, or slice and toast under the grill for 2 minutes per side. A microwave softens the crust into rubber, so skip it.
- FreezingWrap cooled loaves tightly and freeze for up to 2 months; refresh from frozen at 200°C until the centre is hot and the crust crisp again.
- Make aheadIt is the dough that rewards making ahead: after the fourth fold, cover the bowl and refrigerate for 12 to 24 hours, then let it stand at room temperature for 1 hour before shaping, and plan on the longer 60-to-75-minute prove. Baked baguettes are best within hours of the oven, so freeze rather than refrigerate them.
Updated:
How this recipe was developed
- King Arthur Baking, baguette folding, preshaping and shaping technique, plus steam baking until the crust is well caramelised (preshape rest, letter folds, seam-side up on a couche, bake on a hot stone)
- Domson bread technology, oven spring and steam injection: steam for the first 5–8 minutes then vent, lean crusty breads baked to 96–99°C internal, and the faults behind flat, pale or leathery loaves
- The Weekend Bakery, handling high-hydration dough: bench scraper work, wet hands and resisting extra flour
- The Fresh Loaf, baguette crust troubleshooting: early steam for a crisp crust, a drier finish for crackle, and a longer proof for a thinner crust
Editorial references are kept internally for verification. This page makes no claim of external certification or professional testing.
FAQ
The questions we get asked most
Why did my baguettes come out flat?
Flat loaves point to over-proving, or to dough that never built enough strength. Prove only until a floured finger leaves a dent that springs back slowly; an instant spring back means the dough is spent. Do all four sets of folds so the gluten can hold gas, and use flour with at least 12 percent protein, because a weak flour flattens even a perfectly proved loaf.
How do I get a crackling crust instead of a leathery one?
A full 30-minute preheat at 240°C plus 250 ml of boiling water poured into the roasting tin as the loaves go in. The steam keeps the crust flexible while the bread expands, and the dry heat through the second half of the bake is what turns it crisp. Losing the steam early, by opening the door, is the fastest route to a leathery crust.
Why is the crumb tight and bready instead of open?
Under-hydration and rough handling. This dough wants its full 360 ml against the 500 g of flour, and every extra dusting of flour added during shaping tightens the crumb. Roll gently to keep the gas in, and slash just before baking so the loaf opens where you cut it rather than tearing.
Can I make the dough ahead of time and bake it the next day?
Yes, and the flavour improves. After the final fold, cover the bowl and refrigerate for 12 to 24 hours, then let it stand at room temperature for 1 hour before dividing. Cold dough is easier to shape, but it needs the full prove afterwards, usually 60 to 75 minutes rather than 45.
Can I use plain flour instead of bread flour?
Yes, with a couple of adjustments: stir 2 tbsp of vital wheat gluten through each 500 g of plain flour, or blend in 100 g of wholemeal for structure, and reduce the water by about 20 ml because plain flour absorbs less. Expect a slightly softer crust and a marginally smaller rise.
How do I know when the baguettes are fully baked?
The base is the honest test: lift a loaf with a cloth and tap underneath, listening for a hollow ring rather than a dull thud. The crust should be deep golden with the slashes opened into wide lips, and an instant-read thermometer in the centre should read about 96°C. A pale base goes back onto the stone for a few more minutes.
Why did my slashes close up during baking?
A dull blade or a shallow cut; both seal over before the loaf can open. Slash at a 30-degree angle, about a centimetre deep, and overlap each cut slightly with the next, then load the loaves immediately. Dough that sits for 10 minutes after slashing starts to dry and reseal.
Ask KitchenMind about this recipe
Tell it what’s different tonight — it works within the actual recipe.